
Vital Energy Stretches
These exercises, created by Robert C. Fulford, D.O.—a renowned healer and author of Dr. Fulford's Touch of Life—are designed to awaken and strengthen your body’s natural life force. Practiced daily and with proper technique, they can support improved health and greater vitality.
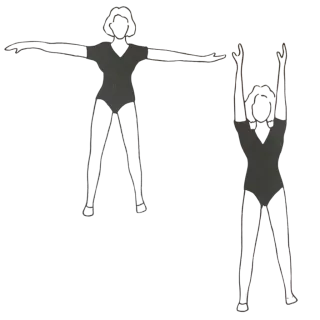
1 Shoulder Hold
Instructions
1 Starting Position
Stand with your feet shoulder-width apart.
Extend your arms straight out to your sides at shoulder height.
Turn your left palm upward and your right palm downward (this helps tighten the body for a deeper stretch).
2 Breathing & Hold
Take full, deep breaths throughout the stretch.
Hold the position for as long as you can, gradually working up to 10 minutes.
3 When Fatigue Sets In
Keep your arms straight.
Slowly raise them overhead (without letting them drift forward).
Then, gently lower them to your sides.
Benefits
- Stretches the muscles in and around the arms and back muscles.
- Helps open up the tissues in the shoulders, improving posture.
- Expands breathing capacity by encouraging deeper, fuller respiration.
- Enhances overall vital energy/life force, leaving you feeling more centered and energized.
2 Piston Breathing
Instructions
1. Starting Position
Sit comfortably in a chair or floor with your back straight.
Relax your shoulders and keep your hands resting on your thighs or knees.
2. Breathing Technique
Breathe rapidly in and out through the nostrils, imitating the pumping motion of a piston.
Deeply inhale quickly, then exhale immediately, without pausing.
Continue this rhythm: in–out, in–out, in–out.
3. Repetitions
Begin with 10 piston breaths.
Gradually increase to 20, 40, 60, 80, 100+ as your stamina improves.
Benefits
- Helps regenerate energy in the body by stimulating fresh oxygen flow.
- Encourages cellular rejuvenation, potentially bringing underperforming or stagnated cells back to activity.
- Boosts circulation and revitalizes overall vitality.
- Enhances overall vital energy and life force while boosting focus, alertness, and inner renewal

3 Pelvic Twist
Instructions
1. Starting Position
Lie down flat on the floor.
Stretch your arms out to the sides at shoulder level.
Position your left palm facing upward and your right palm facing downward (as in the first exercise).
2. The Twist
Gently swing one leg across your body to the opposite side, allowing it to cross over the other leg.
Do not try to force the leg up toward your head.
Let the leg rest naturally wherever it feels comfortable.
3. Hold & Repeat
Stay in this position for 5 minutes.
Slowly return to the starting position.
Repeat the exercise with the opposite leg for another 5 minutes.
Benefits
- Stretches the muscles in the pelvis.
- Relieves tension and discomfort in the lower back.
- Especially supportive for women recovering after childbirth.
- Enhances overall vital energy while promoting relaxation and improving spinal mobility.

4 Back Extension
Instructions
1. Starting Position
Sit upright in a chair with your thighs parallel to the floor and your lower legs perpendicular to the floor.
Bend forward from the hips, placing your elbows on the inside of your knees.
Bring your hands between your feet.
Turn your palms outward, hook your fingers under the arches of your feet, and place your thumbs over the tops of your feet.
2. Stretch
Allow your spine to fully stretch in this position.
Keep your head relaxed and your back rounded naturally.
3. Breathing & Duration
Breathe slowly and fully.
Hold the stretch for 5 minutes.
Practice once a day.
Benefits
- Keeps the lower back pliable and reduces stiffness.
- Makes walking easier and more fluid.
- Helps improve posture, allowing you to stand straighter.
- Enhances overall vital energy while relieving back heaviness for a lighter, more energized feeling.
Important Notes
- If you are flexible enough, you may also do this exercise standing up.
- If you have sciatic nerve pain, avoid this stretch, as it may worsen the condition.

5 Core Release
Instructions
1. Starting Position
Stand with your back against a wall so that your heels, lower back, shoulder blades, and the back of your head all touch the wall.
Raise your arms straight out in front of you, with your thumbs touching each other.
2. Arm Movement
As slowly as possible, raise your arms straight up overhead until your hands touch the wall.
Then, gently lower your arms out and down to your sides.
3. Breathing & Repetitions
Breathe slowly and fully throughout the movement.
Perform the exercise two times, once a day.
Benefits
- Helps pull the rib cage back into its natural position.
- Frees up the diaphragm for easier, fuller breathing.
- Stretches the muscles from the pelvis to the base of the skull, releasing deep core tension.
- Enhances overall vital energy while supporting better posture and body alignment.

6 Shoulder Rolls
Instructions
1. Starting Position
Sit upright in a chair with your back straight and both feet flat on the floor.
Bend your elbows in front of you.
Rest your fingertips lightly on the tops of your shoulders.
2. The Roll
Inhale deeply: lift your elbows up toward the ceiling while lowering your head forward.
Exhale slowly: roll your elbows out to the sides and back down to the starting position while lifting your head back up.
3. Repetitions
Perform 5 shoulder rolls per set.
Practice 2–3 times a day.
Benefits
- Relieves tension from sitting long hours at a desk or computer.
- Stretches and mobilizes the shoulders, neck, and upper back.
- Breaks up tension patterns that lead to stiffness.
- Enhances overall vital energy while promoting improved posture and upper-body circulation.

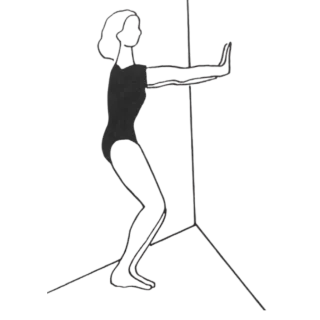
7 Achilles Stretch
Instructions
1. Starting Position
Stand facing a wall with your feet shoulder-width apart, positioned a few feet away from the wall.
Place your palms on the wall at shoulder height for support.
2. The Stretch
Bend your knees as much as possible while keeping your heels flat on the floor.
Maintain this position and allow the stretch to deepen naturally.
3. Breathing & Repetitions
Breathe slowly and fully while holding the stretch for 1 minute.
Repeat 5 times, once a day.
Benefits
- Stretches and lengthens the Achilles tendon.
- Counteracts shortening of the tendon caused by frequent use of high heels.
- Supports healthier walking mechanics and reduces strain on the legs and feet.
- Enhances overall vital energy while promoting ankle flexibility and resilience.
8 Neck Release
Instructions
1. Starting Position
Sit or stand upright with good posture.
Place both hands behind your head, interlacing your fingers for support.
2. The Push-and-Pull
Gently press your head backward into your hands while simultaneously pressing your hands forward against your head.
Keep your head straight and stable—do not let it move forward or backward.
3. Duration
Hold the push-and-pull for as long as you wish, breathing slowly and fully throughout.
Benefits
- Stretches and strengthens the muscles in the neck area.
- Improves circulation in the neck and head.
- Relieves stiffness and tension, especially helpful for those with tight or sore necks.
- Enhances overall vital energy while supporting improved posture and spinal alignment.

Important: This information is for educational purposes only and is not a substitute for medical advice, diagnosis, or treatment. Before starting any workout or any new exercise routine, consult a doctor, especially if you've been inactive for a while.